With the launch of the Beta version of Google Android Q, many devices have been receiving updates for the beta version of the OS before the final release. The stable build of the Android Q is expected to be launched in the 3rd quarter of the year.
The Android Q OS is its current beta stage is quite stable when compared to its previous beta update. The Android Q also brings in several new features along with it. The current beta OS supports Google Pixel 3 among the listed devices.
Here are some listed features which will be present on the Android Q OS which will support devices which run on pure android without any modifications. Currently, Google is in the process of taking reviews from developers all over and has put out several features to be tested for functionality.
Privacy features like location permissions, restricting background data and background activity are available for test
Gesture navigation is also available for test
The camera now gets a new dynamic format. AV1 for video streaming and HDR10+ for hu=igh dynamic range video is available
A dark theme is also added
For better multimedia experience suggested replies, notification panel and settings panels come along
Audio playback capture which enables captioning and gameplay recording
To get android Q on your device, it has to be in the compatible devices list. Currently, the android Q beta is available for the partner OEMs, mainly the Xiaomi Mi 9, Xiaomi Mi Mix 3 5G, Asus Zenfone 5z, Essential Phone, Nokia 8.1, Huawei Mate 20 Pro, LG G8 ThinQ, OnePlus 7 Pro, OnePlus 7, OnePlus 6, OnePlus 6T, OPPO Reno, Realme 3 Pro, Sony Xperia XZ3, Redmi K20 Pro, Tecno Spark 3 Pro, Vivo X27, Vivo NEX S, and Vivo NEX A which have received the beta update. Not only this, Google will update these devices everytime with new beta releases until the final build is rolled out.
Building your own computer can be a very satisfying task – it allows you to work on something you can use for years! It’s also much cheaper than buying a prebuilt one, and although it may take a little more time, is certainly worth the effort. It can, however, be confusing, so we’ve got a few tips on the ins and outs of building a computer so you can be certain you’re doing it right.
Which Components Make Up a Computer?
The biggest component of most computers is the motherboard – here you will find the CPU, the RAM, graphics cards slots, connection ports, storage drives and related components. Everything goes back to the motherboard, from the power supply to the hard drive, so it’s important to be familiar with it and its components. Most manufacturers set standards for motherboards – there are 2 major CPU manufacturers, Intel and AMD, and their standards are different, so you must purchase the appropriate type of CPU to fit with the motherboard. Whenever you’re looking at sourcing parts, make sure to get the right parts for your computer – use a part number search engine so you know and can order the exact parts you need.
What Is the Basic Layout of a Computer?
Most computers have a similar layout, making it easy for you to familiarize yourself with. The motherboard is situated at the back of the case, and this is the first thing you place in. Everything stems up from this. On the motherboard, you attach the CPU, then the RAM, then the wires connecting to various components around the computer (e.g. your storage drives). Most cases have dedicated storage bases where you screw in the hard drive – the same goes for power supplies, and this should be easy to locate via observation or an instruction manual. Some cases have USB ports in the back as well as the front, and it may be worth investing in one like this, particularly if you plan on using plenty of cables!
Remember – Safety First!
The main killer of work-in-progress computers is static electricity – be careful with where you assemble your computer, as using anything but a wooden or plastic surface can cause static electricity to generate which can fry your parts, costing you time and money. These are fairly common-sense safety tips, like turning off the power before you start working on your computer and being careful with the parts. It is also important that you aren’t tempted to force pieces into place, as this could cause much more damage than good. Another important tip is to avoid leaving metal against metal once your computer is assembled – turning your computer on with two pieces of metal touching can also fry your computer. This is especially important with screws – don’t screw things in too much as they may touch the case and, again, fry. It’s also worth looking over instruction manuals beforehand as well as YouTube videos – these can be a plentiful source of information.
Building a computer can feel daunting, but using these tips will give you the boost you need to do the job.
Smartphone photography has vastly improved in the last few years. It is relatively easy now to carry and get the best images from a vacation from just your phone. All you need to do is get used to your phone camera settings and use its capabilities to improve the quality of the images you take.
While most of us prefer to use our phones for taking most of the pictures, be it a casual vacation or a few images for your Instagram blog, it is important for the images to convey the message. Here are a few tips which cover most of the aspects which you can use and see how much better your images become, especially for those serious photography sessions.
Check the Lighting – Light can make or break an image. Proper lighting around your subject and you will be amazed by the quality of it. Similarly, when you shoot an image in poor light, the image quality will be poor even if the smartphone camera is capable. For heavily sunlit or ambient lit images, take your subject to a shade. The light in the shade is diffused and that is exactly what you need for a portrait of a person. Harsh light creates very hard shadows which make the image look very contrasty and uneven. For indoors, place your subject near to the windows where you will have the external light coming in and evenly lighting the subject’s face.
2. Tap to focus and meter – Your smartphone camera can focus as well as meter reading for an image all by itself. You need to keep your camera steady and tap the subject in your frame. Similarly, you can tap for it to meter the settings of the shot. At times, you will have to deal with the part of the day when the background is brighter than the subject. Such situations can create very poorly lit images, especially the subject. You can also choose to override the automatic settings and use the manual/professional mode of the camera for a better picture. I this way you will have more detail in the image, especially in the shadow regions. Using the HDR more is also helpful, however, sometimes too much of HDR in an image can ruin it.
3. Set shortcuts – When you are an avid shutterbug, you need to set the available shortcuts for your smartphone camera. This will allow you to quickly open the camera app and shoot whenever you come across something interesting. On some android phones, double-tapping the power button launches the camera, while one can also set the volume up/down button for a physical shutter button. For iPhones, a quick swipe is enough to fire the camera app. You can also go to the control centre, long-press the camera icon to display multiple options like taking a selfie image or to record a video. You should be able to access the camera app quickly, regardless of the phone you have,
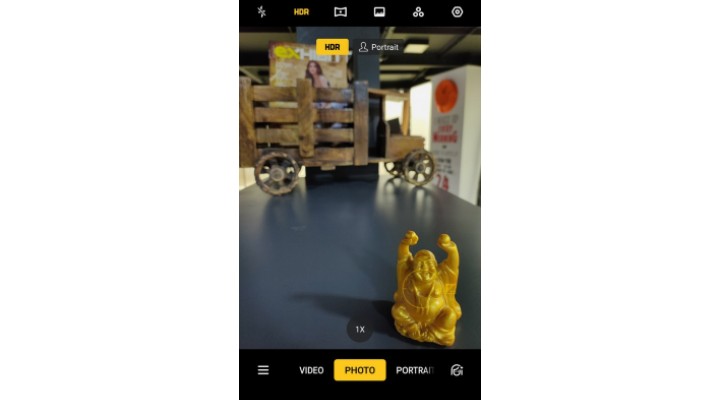
4. Use portrait mode often – You might think that the portrait mode is handy only when shooting portraits but no, you can use the portrait mode more often. The portrait mode can actually help you isolate the subject (both human and still) and create a background blur. You can use to portrait mode to take good images even when the background is disturbing. However, a clear background makes a better image as so as placing your subject far away from the background does. Not only this, you can use the telephoto mode (which most smartphones have these days, courtesy, more cameras on smartphones, you can easily create the depth effect on the image.
5. Shoot RAW/High-Quality JPEG image – Smartphones are blessed with amazing features. One of them is the ability to shoot in RAW or high-quality JPEG images. RAW image files have the most amount of details captured. Some smartphones allow capturing RAW or DNG files for maximum quality. For those smartphones with JPEG only output, you need to set your JPEG to ‘Large’ or the maximum setting available. This will allow you to extract the best out of the image later in a post-processing application like Snapseed.
6. Keep it clean – Well, who wants to have a dirty phone or a dirty camera lens for a matter of fact. You should take care or at least take the effort to wipe your camera lens before shooting. Since most smartphones have a bigger camera module which is slightly raised from the rest of the smartphone back, use a cover to protect the back of the camera as well as the smartphone itself. A clean/unscratched lens will go a long way in taking good images. So what are you waiting for, go ahead and make some great looking images?